Most people immediately go for a graphics card upgrade or additional RAM when they want to get the most out of their computer. But what if the BIOS, a hidden location you not often access, actually contains the performance boost?
Even before your OS runs, the BIOS is quietly controlling the communication and performance of your devices. A slow system can be turned into a fast, responsive machine with the correct adjustments.
Understanding the BIOS can significantly impact your experience, whether you’re a gamer seeking higher frame rates, a content developer handling large files, or an individual seeking a faster and more seamless system. When left at their defaults, features like XMP profiles for RAM, CPU power management options, boot priorities, and storage configurations are safe but rarely optimized.
Optimizing your BIOS will not cost you a dollar, which is its beauty. Realizing your hardware’s full capability is the key. Naturally, these settings aren’t universally applicable, so it’s important to tweak them carefully.
With the optimal BIOS settings for peak PC performance outlined here, along with explanations of what they accomplish, you can tweak your system with confidence—no needless risks, just wiser performance.
What is BIOS & How Does It Impact PC Performance?
Your computer’s symphony is subtly led by the Basic Input/Output System, or BIOS. The BIOS powers up your hardware, checks that everything works, and decides how your components should act long before Windows or any operating system flashes onto your screen. It may just reside on a little chip in your motherboard, but it affects every part of your computer.
Pretend it’s the command center where all your computer hardware—CPU, RAM, storage disks, and fans—is kept. The BIOS initializes the CPU, adjusts the memory speeds, configures storage modes, and decides the boot order every time you push the power button. If these settings are too conservative, you may not be using your hardware to its full potential.
Until you activate its optimum profile, high-speed RAM, for instance, often operates at lower default speeds. Careful power settings, made for stability rather than performance, can limit CPUs. Incorrect configuration can cause even storage disks to underperform.
To sum up, the BIOS does more than turn on your computer; it also determines how well it performs. You can get better responsiveness, shorter loading times, and smoother multitasking without spending a dime if you tweak it exactly so.
Best BIOS Settings to Improve PC Performance
Maybe your computer can do a lot more than you think it can. Subtly controlling your hardware’s behavior is the BIOS (or UEFI), which is located beneath the operating system. You may improve responsiveness, multitask more smoothly, and speed up your system without spending a dime or downloading any additional components by tweaking a few performance-oriented settings.
Listed here are the BOS settings that have the greatest impact on actual performance, with detailed explanations and how-to instructions for applying each one in a safe and effective manner.
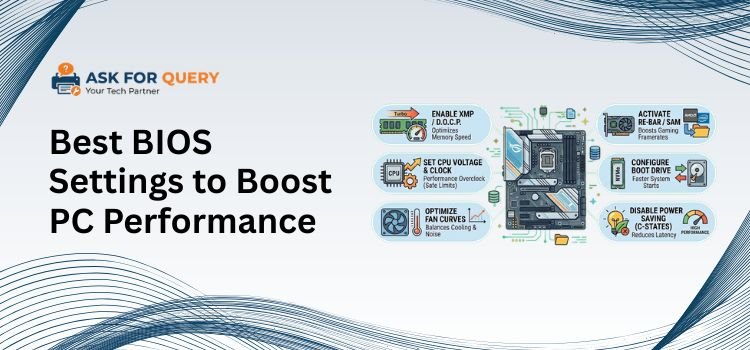
1. Turn On XMP, DOCP, and EXPO
Memory modules nowadays are engineered to operate at faster speeds than what motherboards typically employ. Unfortunately, unless you actively enable a memory profile, your RAM will operate at significantly slower, safe speeds, resulting in a sacrifice of performance.
Your system can automatically apply the manufacturer-tested frequency, voltage, and timing values by enabling XMP for Intel or DOCP/EXPO for AMD. This enhances the responsiveness of the system, multitasking capabilities, gaming performance, and rendering.
- Press DEL and F2 during startup to enter BIOS after restarting your PC, and then switch to the Advanced Mode (usually F7).
- Go to AI Tweaker, Extreme Tweaker, or Overclocking.
- Navigate to XMP, DOCP, or EXPO Profile and set it to either Enabled or Profile. 1.
- Exit BIOS after saving modifications.
Result: Better application performance, less latency, faster memory bandwidth, and more fluid gameplay are the results.
2. Enhance CPU Power and Performance by Customizing Settings
The purpose of imposing conservative power constraints on CPUs is to guarantee stability and compatibility in all situations. Although these defaults are safe, they may hinder your processor’s ability to maintain higher boost clocks when under strain.
For improved performance in demanding applications like games, video editing, compiling, and heavy multitasking, you can tweak the CPU power management settings to keep the processor running at higher speeds for longer.
- Navigate to CPU Configuration or Advanced Settings after you enter BIOS.
- Find CPU Power Management, CPU Features, or Advanced Frequency Settings.
- Choose Performance Mode or Power Mode and hit High Performance or Enabled.
- If you prefer optimum responsiveness, you can disable CPU C-States. However, this may increase the power used when the computer is inactive and then saved and closed.
Result: Increased sustained CPU clocks, fewer performance dips, and more consistent workloads.
3. Switch Storage Drives to NVMe or AHCI Mode
Storage performance significantly influences system speed. This includes boot times, file transfers, and application loading speeds. A solid-state drive (SSD) may function poorly if it is not operating in the proper mode.
While current PCIe SSDs run at maximum speed thanks to NVMe, sophisticated features like Native Command Queuing are made possible by AHCI for SATA SSDs.
- Go to Storage Configuration or SATA Settings once you’re in BIOS.
- Avoid using IDE or Legacy and instead set SATA Mode to AHCI.
- Before proceeding, make sure that the NVMe Configuration or PCIe Storage sections accurately identify the NVMe SSDs.
- Reboot after saving settings. Make sure AHCI was enabled before installing Windows, as changing SATA mode after OS installation may need registry adjustments.
Result: Decreased system latency, enhanced file transfers, and quicker boot times.
4. Make Boot Priority Work Better and Enable Fast Boot
At startup, BIOS examines all of your hardware components. Once your system stabilizes, many of these checks become unnecessary.
By adjusting the boot priority, you can stop the system from scanning devices that aren’t in use, and Fast Boot will skip over unnecessary startup tasks.
- Launch the [Boot] tab in BIOS.
- Turn on Ultra Boot or Fast Boot.
- Choose Boot Option #1 to use your main solid-state drive (SSD) or non-volatile memory device.
- Deactivate any boot options (USB boot, network boot, DVD drive) that you don’t utilize.
- Restart after saving.
Result: From the moment you turn the power on, your system is noticeably quicker and more responsive.
5. Reduce Throttling by Enhancing Cooling and Fan Performance
Temperature is an additional factor to consider when evaluating performance. Thermal throttling is the automatic reduction in performance that occurs when your central processing unit or graphics processing unit becomes too hot.
Improving cooling through fan behavior optimization keeps components running at peak performance even when under heavy load.
- Launch Fan Tuning, Q-Fan Control, or Hardware Monitor after entering the BIOS.
- Change the setting of your fan profiles from silent to performance.
- Make your own unique fan curve that activates fans sooner in response to rising temperatures.
- Put the right fans in the right places: the CPU, the intake, and the exhaust.
- Be sure to save your modifications.
Result: A decrease in throttling, a quieter operation even under light loads, and lower temperatures.
Conclusion
Optimizing your BIOS is a wise performance boost because it is free and compatible with your current hardware. Changing these settings won’t make a budget PC perform like a high-end model, but they will remove limitations that hinder system performance. Optimal performance is achieved when memory functions at its intended speed, CPUs are permitted to boost appropriately, storage is operated in the correct mode, and cooling is optimized for real workloads.
This results in faster app loading times, more seamless multitasking, and more consistent performance even under heavy demand. Always prioritize stability over aggressive tweaking, and as each system is unique, it’s crucial to find the optimal balance. Be patient, tweak the settings one by one, and learn the ins and outs of each menu item. You can turn your BIOS from a mystery into a potent tool for optimizing your PC with some careful tweaking.
Explore More Blogs:- Click Here
